Due to MDM requirements in our company, it turns out some team members had to move from Linux machines to macOS. I’ve been through this transition myself a decade or so ago, and since I was a Linux user first - and still am at heart - with a lot of habits and expectations, I’ve learned a few tricks along the way. One of my fellows suggested I collate these tips into a blog post, so here it is.
In this guide I cover some areas that make macOS behave a little bit as a Linux user would expect, while not pretending to bend over backwards to make macOS a Linux clone, which would be a doomed strategy (for anything, really).
I’m not going to derail into how this or that is better or worse on one or the other side of the fence, I’m just trying to make the experience a bit smoother when you’re used to Linux and have to drop into macOS regularly.
The dreaded TouchBar
Make sure to tune the TouchBar. You can have the extended control strip by default, pick F1-F12 on fn mod, and make it behave a certain way in specific cases, e.g. display F1-F12 as main per app in the Shortcuts tab, Function Keys section.
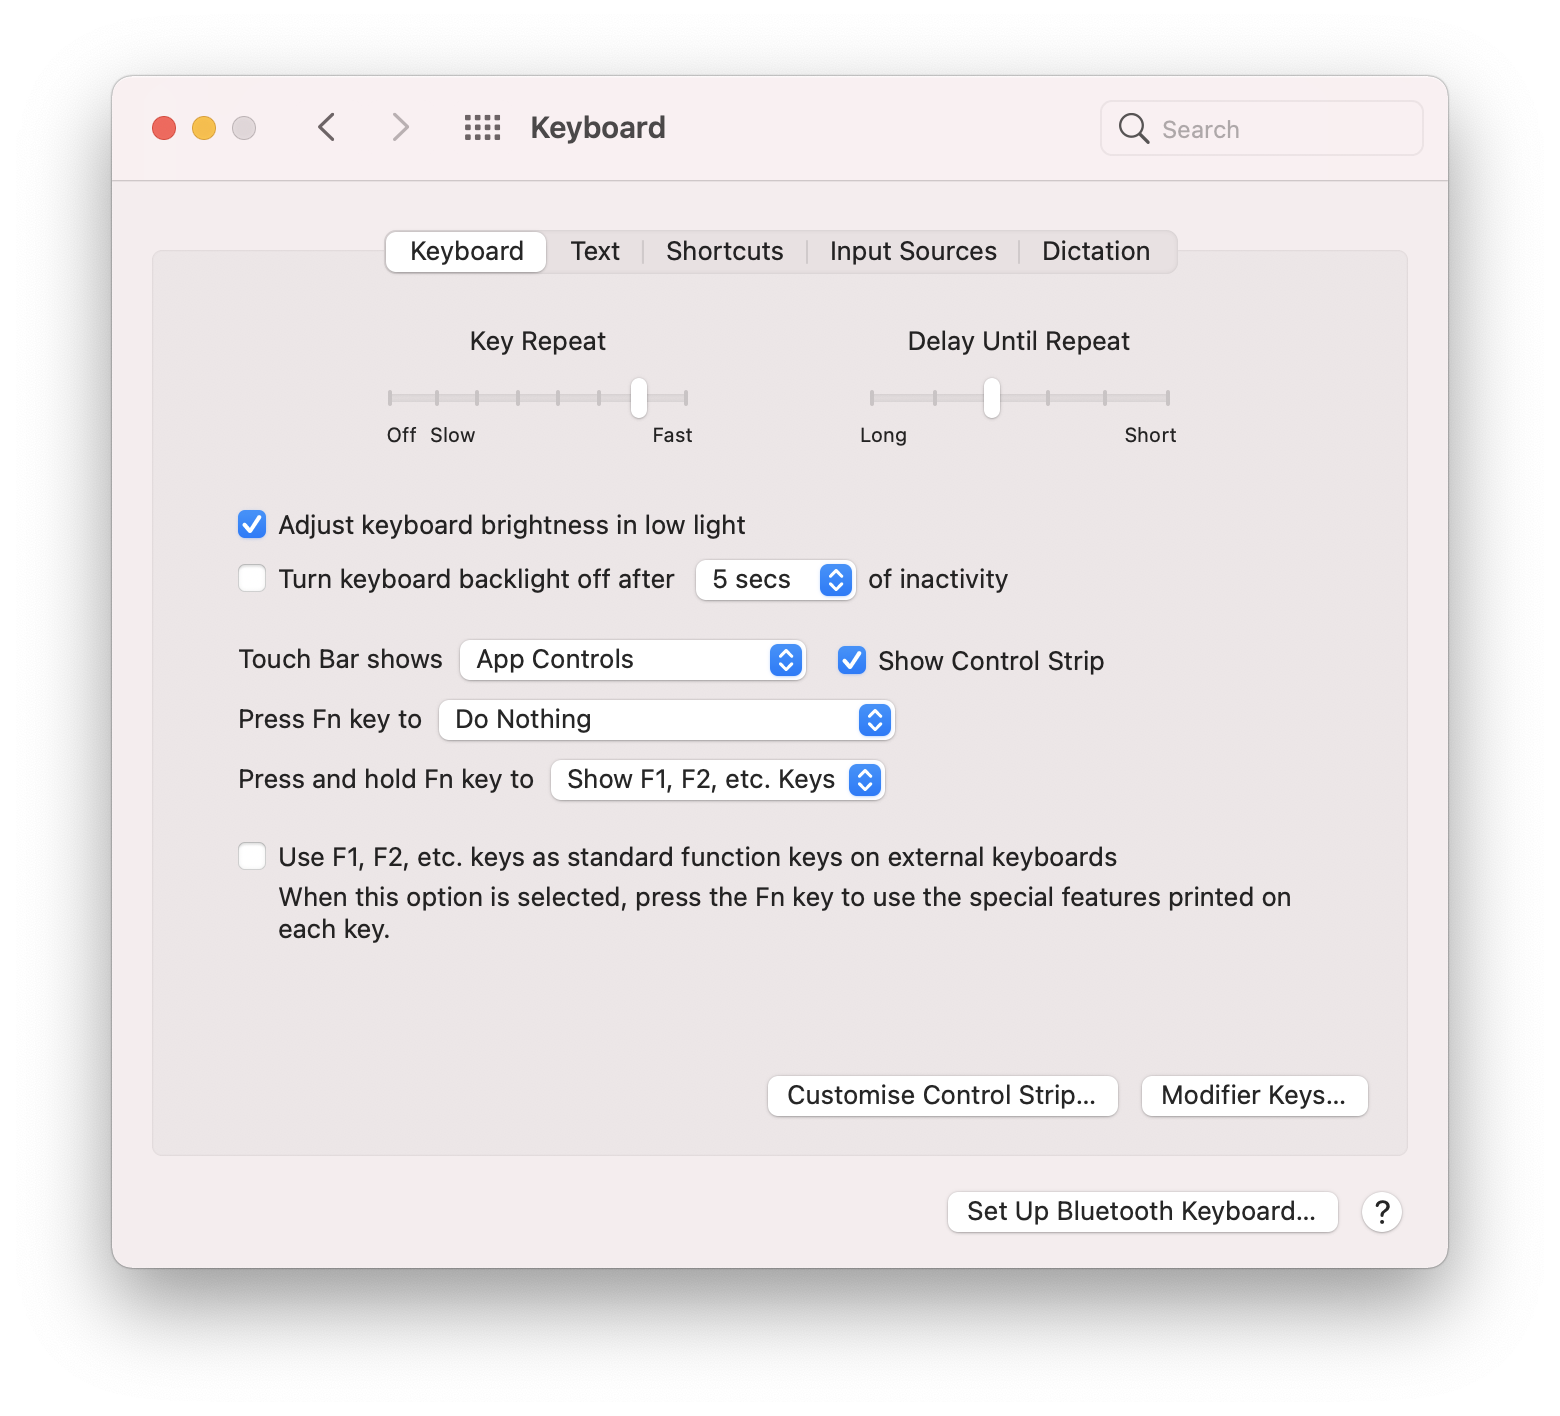
But also understand that the reduced control strip has some interesting perks: you don’t have to touch brightness or volume and then only move to the slider, you can press and slide right away without lifting the finger!
A must have for the Touch Bar is Haptic Key, which creates haptic feedback on touch. It’s a game changer.
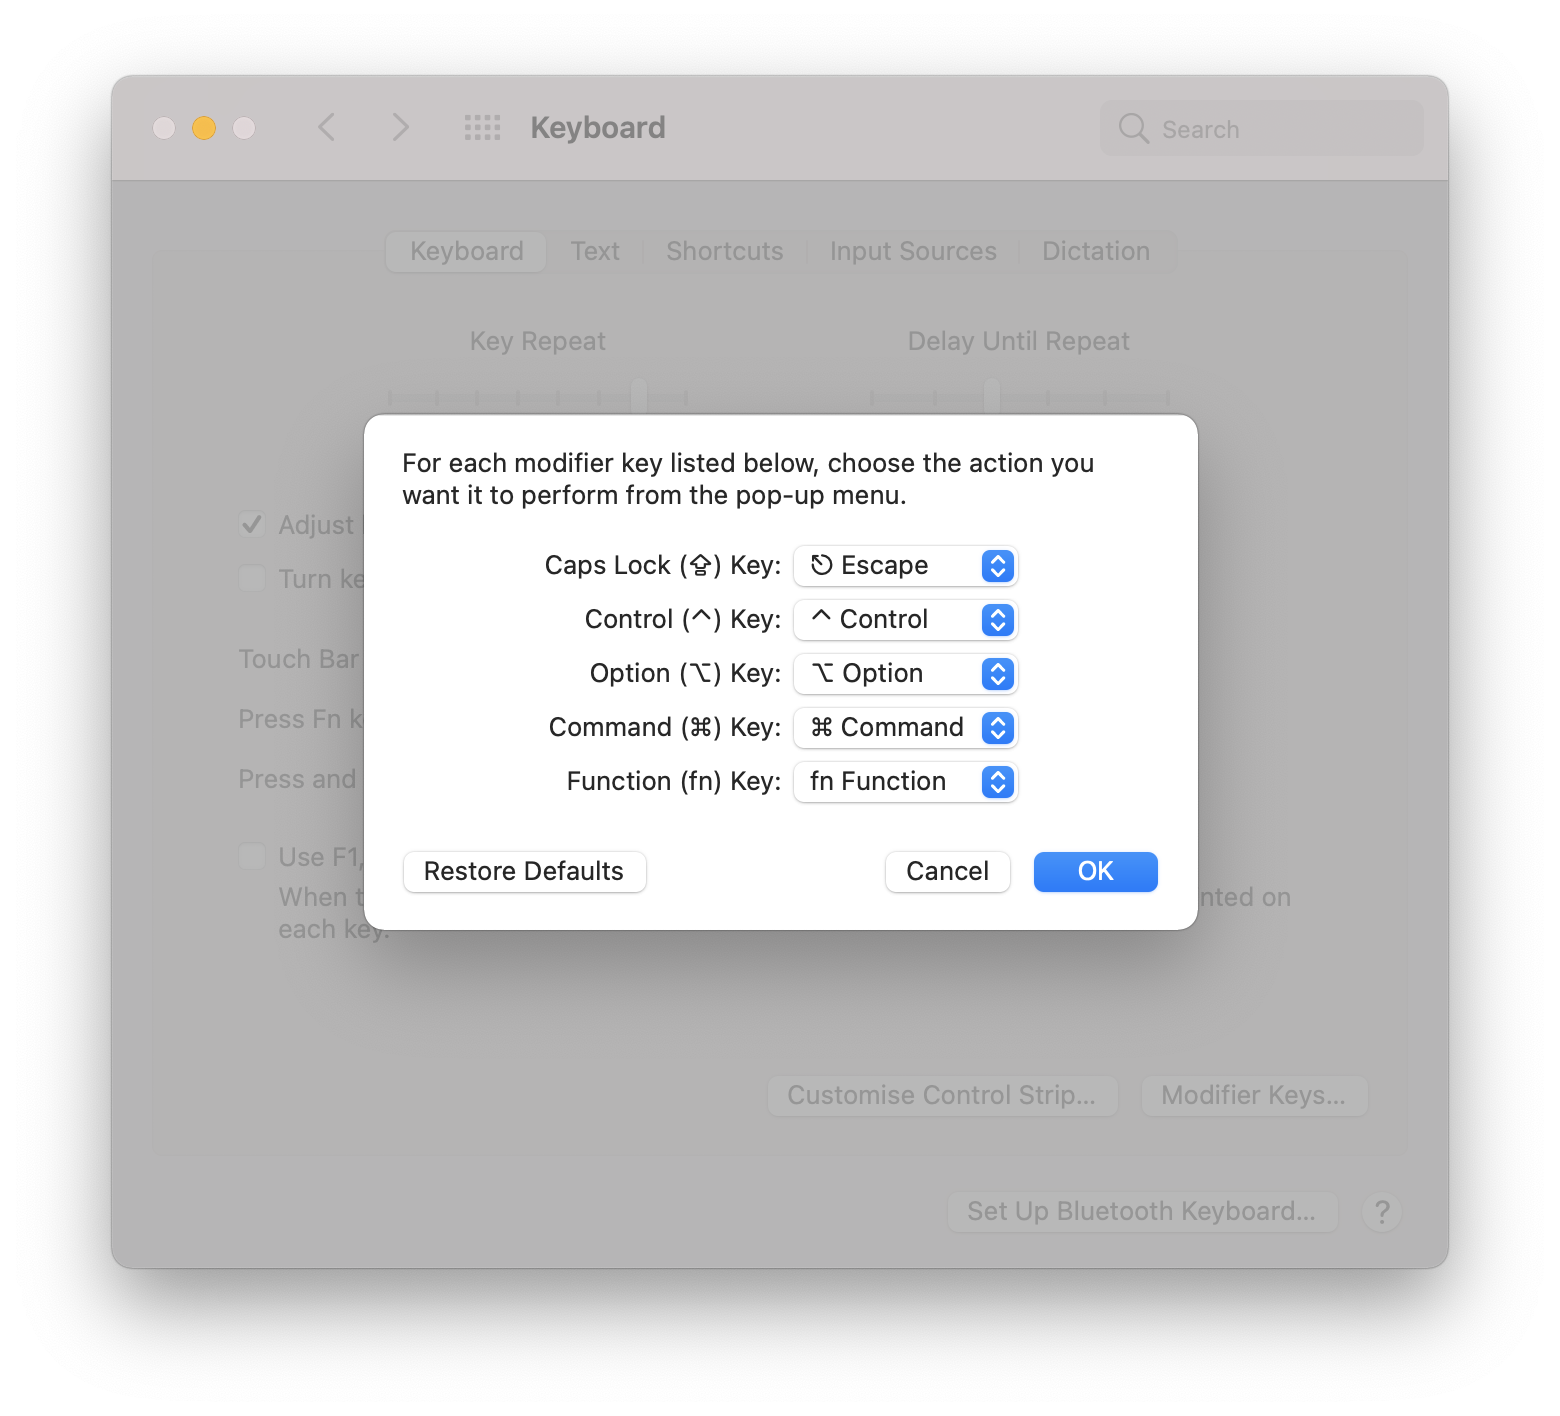
You might be interested in remapping Caps Lock to Escape or Control, depending on your habits and favorite editor. You can do so per keyboard in System Preferences, Keyboard, Modifier Keys.
Spotlight
I have it bound to Command+Space, but the default modifier might be different. I mostly start my apps this way, and have the Dock auto-hide.
Using Command+Return on a search result opens the parent directory in the Finder instead of the search result itself.
Virtual desktops
Make sure to adjust some settings in System Settings, Mission Control, for example uncheck Automatically rearrange spaces based on recent use, which is a braindead setting, especially with the tip below.
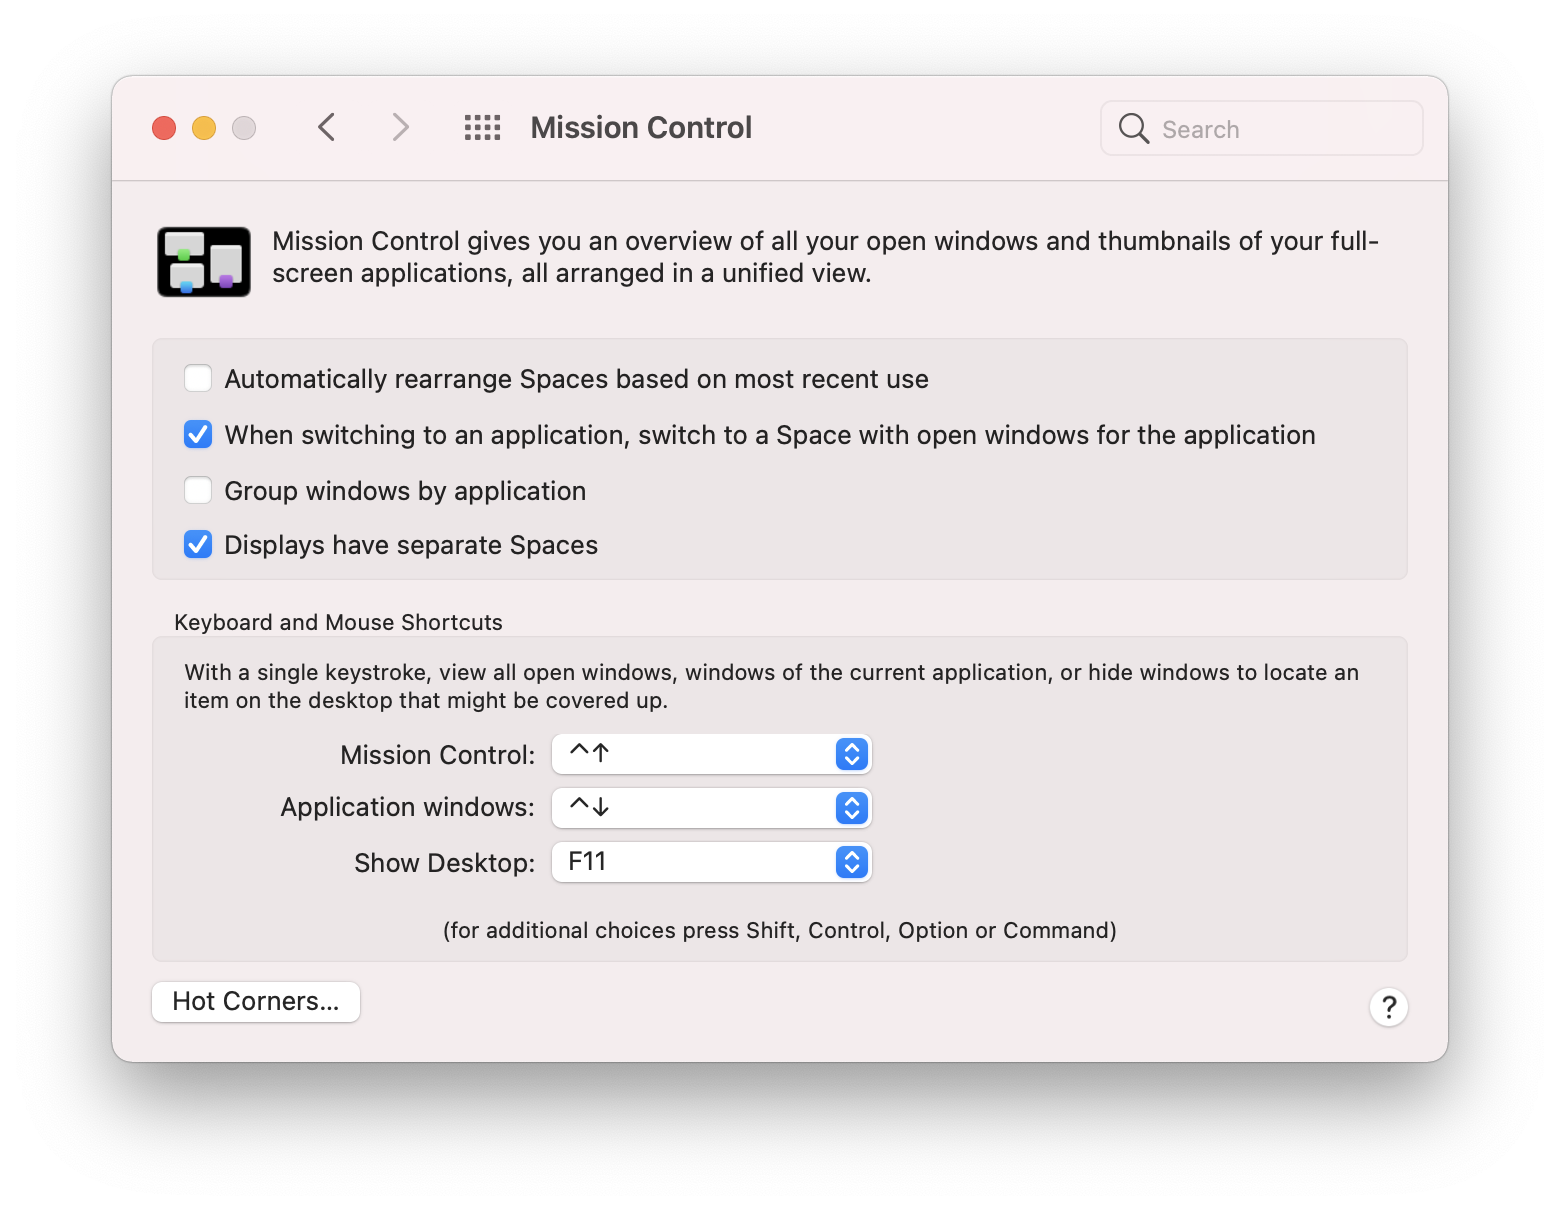
Indeed, slide up with 3 fingers to enter Mission Control, then move the pointer up and add 10 desktops.
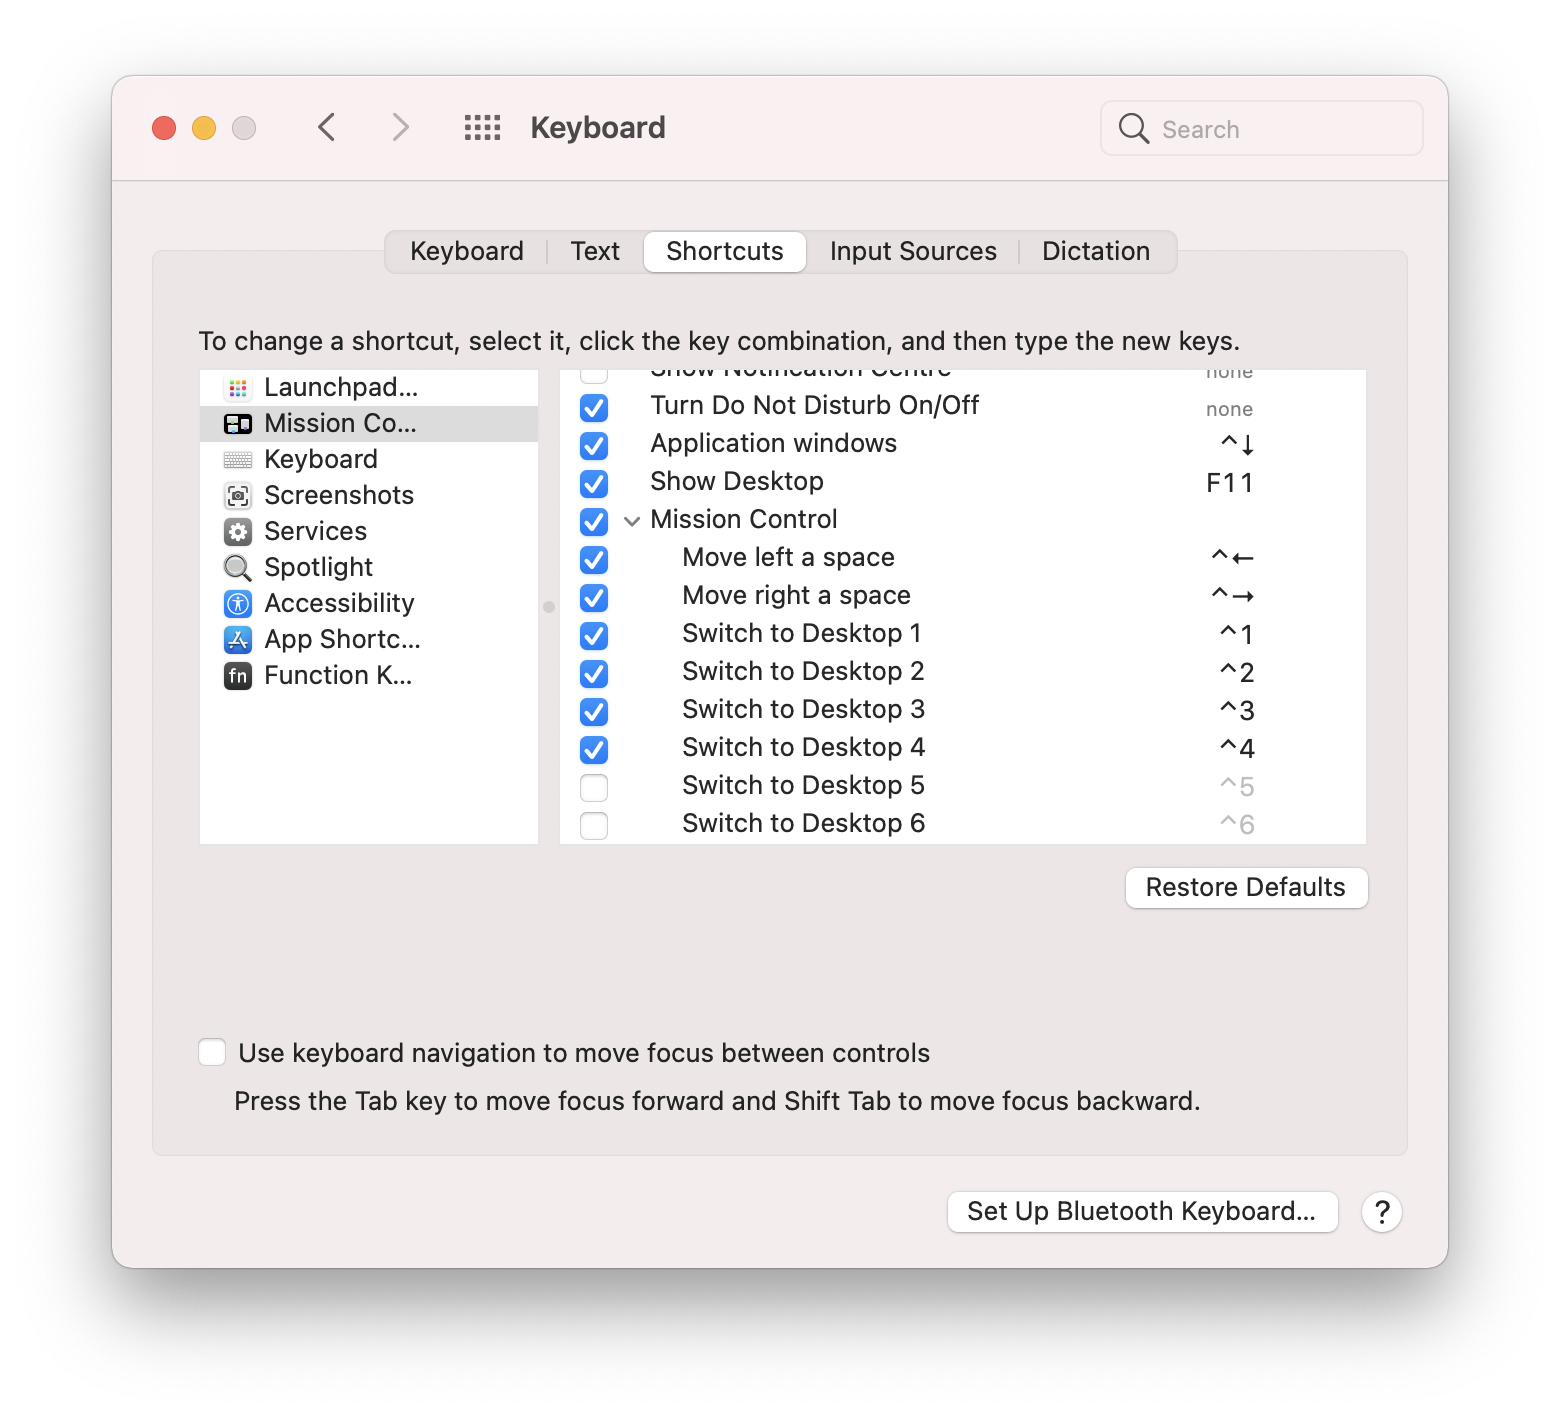
Then in System Preferences, go to the Shortcuts tab, and enable ^1 to ^9, and ^0 (the shortcuts only appear if the desktop have been created, they then stay).
With the previous tip about disabling automatic ordering, this makes your virtual desktops much more reliable and quick to jump to.
A quick note: spaces are a superset of virtual desktops, and also includes fullscreen apps. This ties in nicely with the Displays have separate Spaces options, allowing you to shuffle all of them around independently on multihead setups. But the ^n shortcuts only jump to numbered virtual desktops, not fullscreen app spaces. For that, you’ll need to use relative movement with Control+Left/Right.
Tiling and snapping
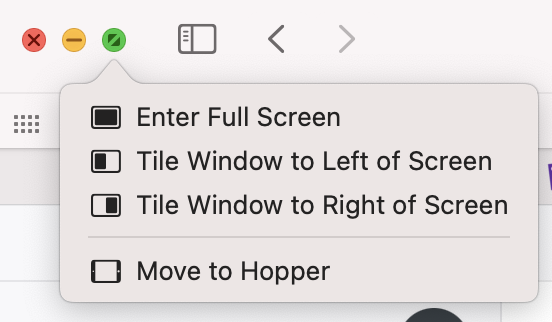
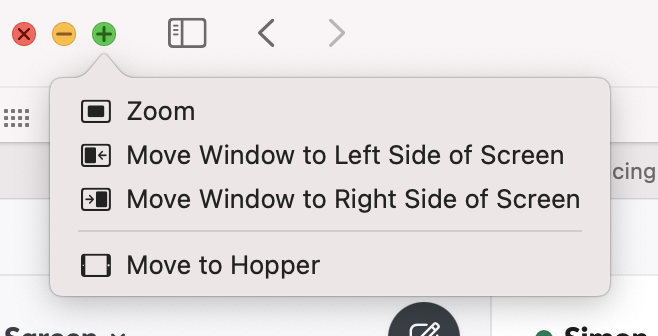
Since a few macOS versions, there is native support for limited tiling and snapping. Tiling works by dedicating a space to one (fullscreen) or two (side by side) apps, while snapping is quick window resizing.
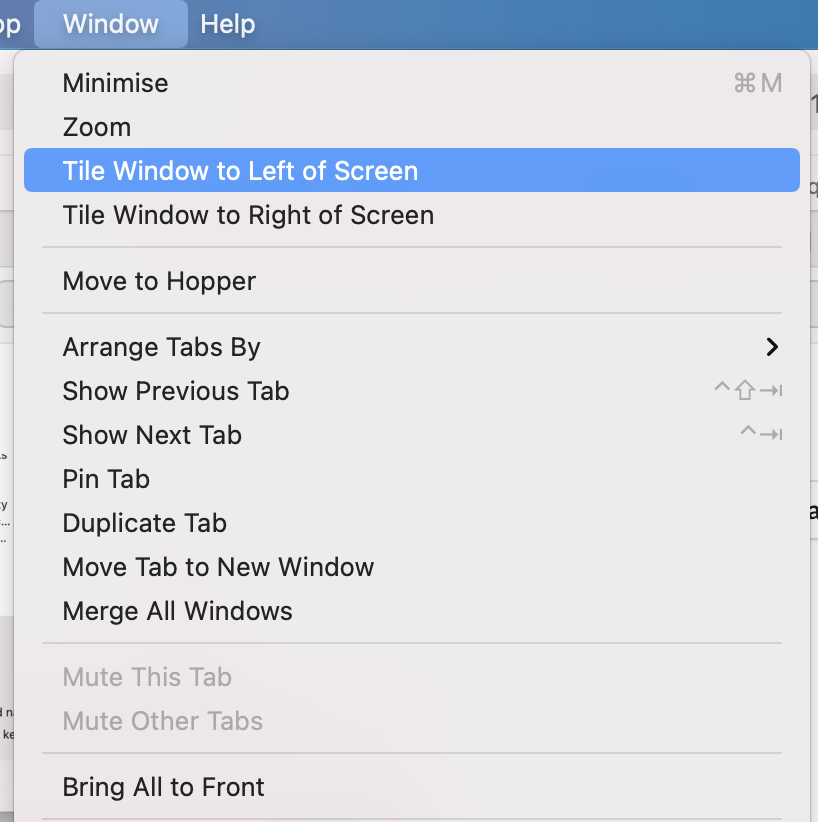
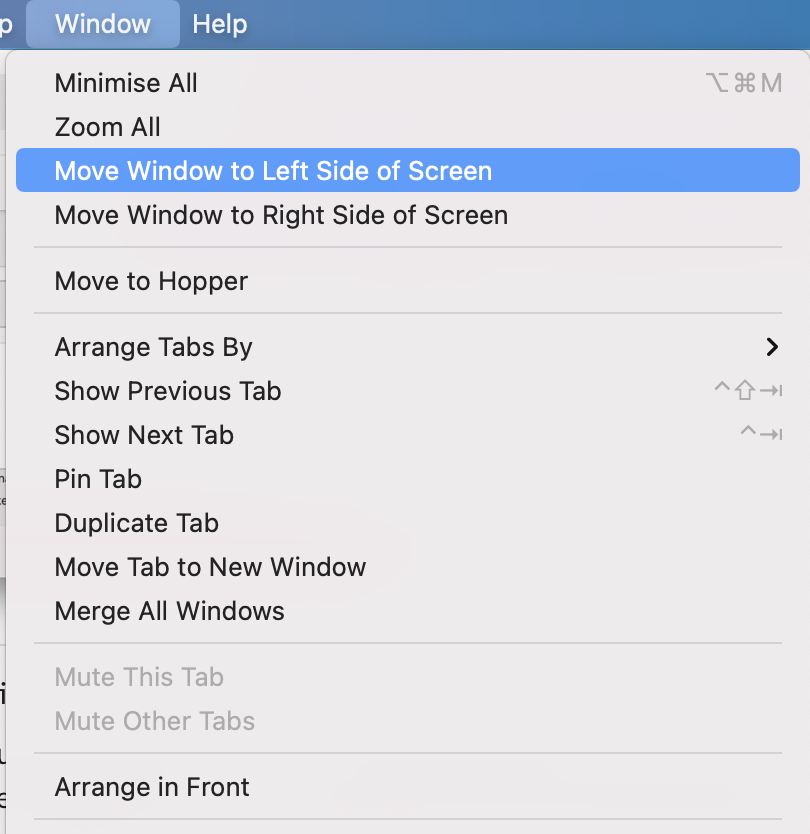
Hover over the green traffic light in the titlebar, and a menu will appear, revealing tiling options. Press option to reveal alternate options for snapping. You can find these options back in the Window menu in the menubar.
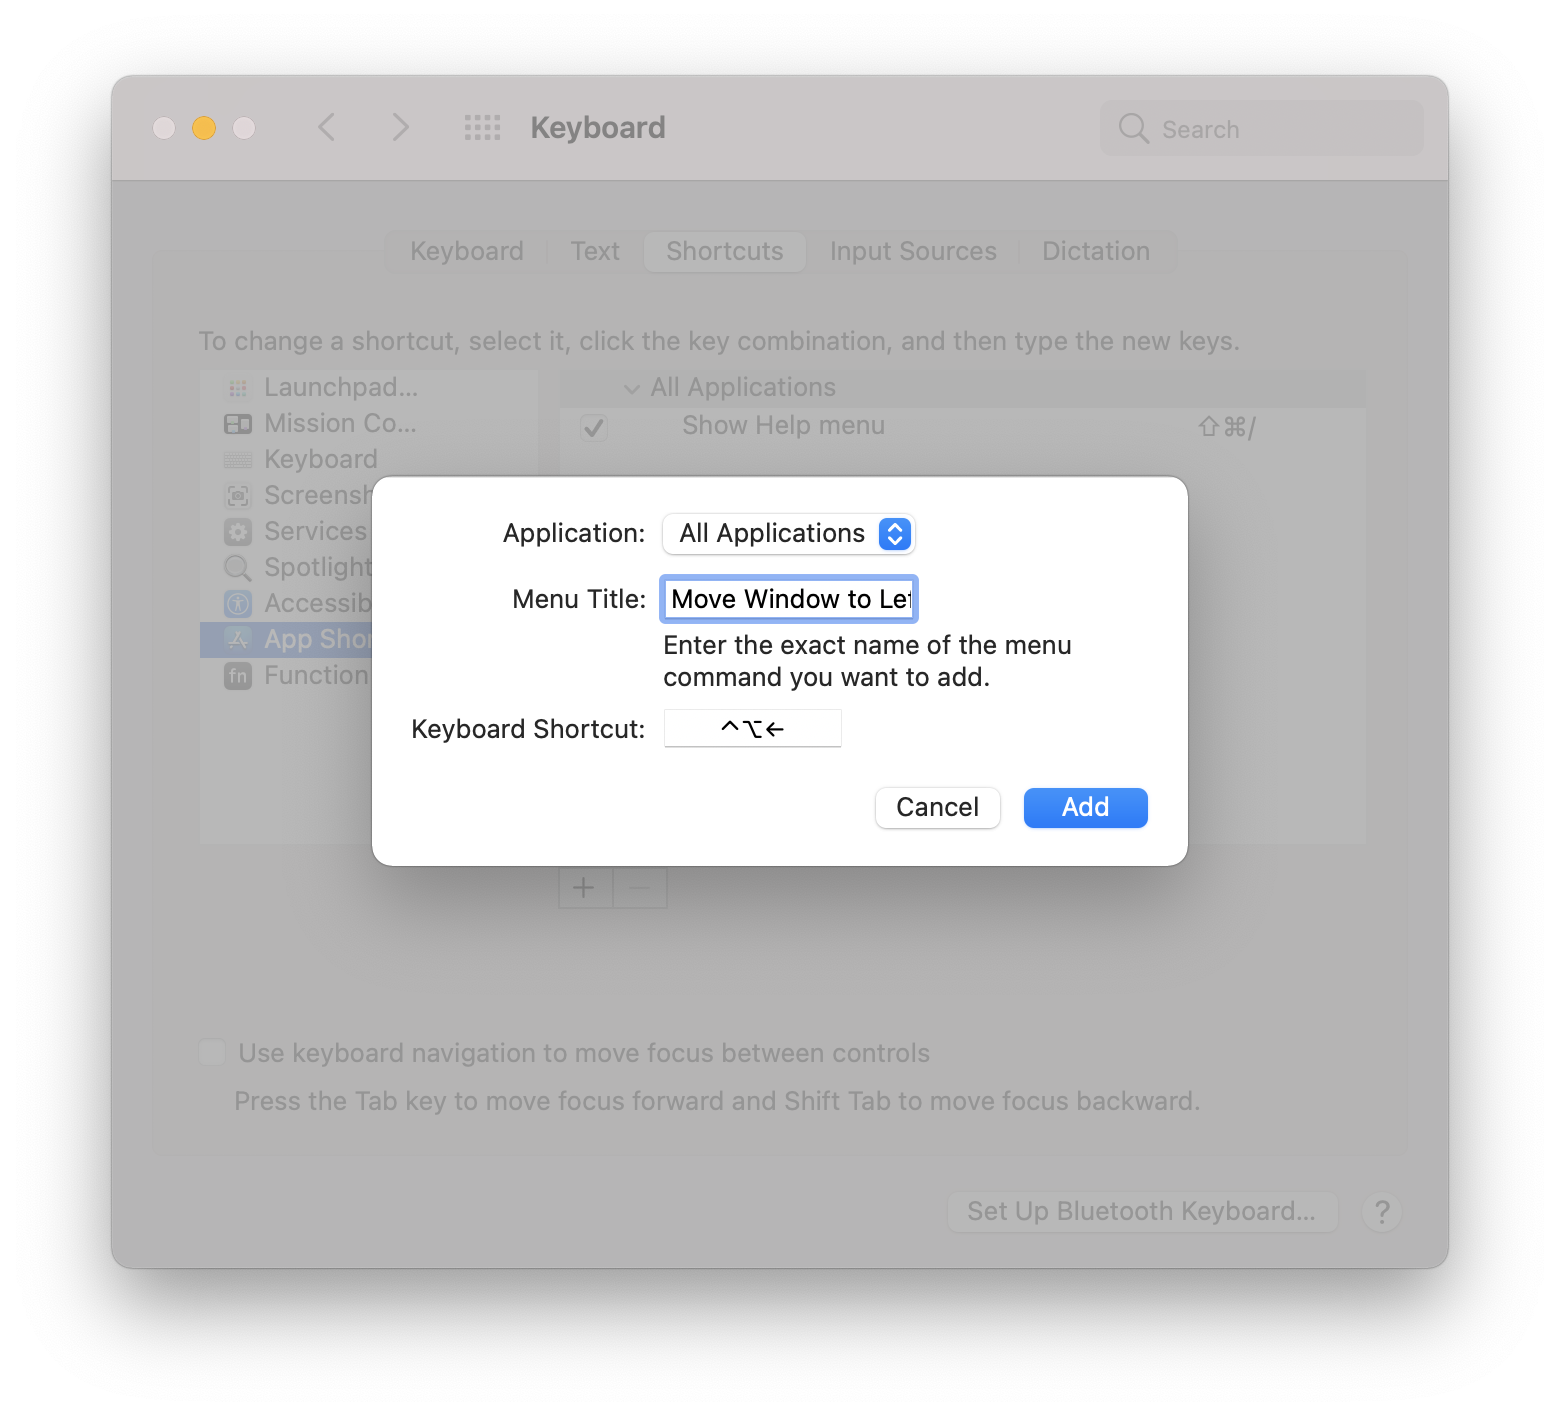
And since it’s up there, you can leverage a really nice feature of macOS, that enables you to assign any menubar entry to any shortcut, in any app, or for all apps.
- Go to
System Preferences,Keyboard,Shortcuts - Select
App Shortcuts - Click on
+ - Select
All Applicationsin the dropdown - Type the menu entry label EXACTLY (it’s case sensitive)
- Press the desired shortcut in the box below
I use Control+Option+Left/Right for Move Window to Left Side of Screen and Move Window to Right Side of Screen, and Control+Option+Return for Zoom (a.k.a maximise)
For some more advanced snapping I use an app called Magnet. It’s simple, works well, and allows for dragging to various parts of the screen to snap in maximised, half, thirds, or quarters.
Screenshots and screen recording
There are four shortcuts for that:
Command+Shift+3: instant whole screenshotCommand+Shift+4thendrag: area screenshot, instant upon mouse button releaseCommand+Shift+4thenSpacethenclick: instant window screenshot (as showcased in this very article)Command+Shift+5: advanced screen capture, including screen recording, output location, and delay
If you want to trim and reencode recordings, Quicktime Player is your friend.
Terminals
Terminal.app gets a bad rep, but it carries that from early broken versions. Today it’s one fo the top contenders in critical areas such as latency, color accuracy, compatibility, and pragmatic featureset. The automatic (magically, on each prompt) and manual (with Command+Return) line bookmark that you jump to with Command+UP/DOWN is a feature I can hardly live without now.
There’s the much touted iTerm 2, with many, many advanced features, but personally I don’t have much use for them so it’s just dead weight to me.
The base system
It’s based on BSD, so the command line tools are BSD tools. They’re not crippled, they’re just lacking GNUisms one might have grown accustomed to. Here’s an opportunity to learn about portability across unixes.
The init system
The equivalent of systemd is launchd, you control it with launchtl. There are two modes of operations, as seen is the various Library directories:
LaunchDaemons: started at boot, run asrootunless instructed to drop to another user/group, no access to UI and windowing. More likesystemd/system.LaunchAgents: have access to UI and windowing, started on login, there is one folder per user and one global applying to all users. More likesystemd/user.
The dev environemnt
You probably want some source control, compiler, libs, and headers, the Command Line Tools can be quickly made available using xcode-select --install instead of reaching for the big Xcode download.
Many things are sandboxed by default, so you may or may not want to enable the following for your terminal app in System Preferences, Security & Privacy:
Full Disk Access: allows any program called within the terminal to reach anywhere in the filesystem treeDeveloper Tools:` allows to run programs that run afoul of some security policy
Be sensible and use caution when disabling or overriding security features.
XDG, FHS, and filesystem things
Yes, the filesystem is case insensitive by default.
xdg-open has an equivalent, which is simply open (frequently used with the -a flag).
Like with XDG and the FHS, there’s a whole filesystem standard that may seem alien, but it’s quite useful and stable. You should quickly get the hang of things like Library/Caches.
/ is not writable anymore. There’s /opt and /usr/local though. If you ever need something at the root, look for /etc/synthetic.conf and APFS (which has some btrfs-like features such as subvolumes and snapshots).
xattrs, chflags, and ls -l@ may help you reach out to mysterious filesystem metadata.
There’s a concept of directories called bundles, that present themselves as a single unit in the UI. Look into a .app form the terminal, or see how .localized items have different display names in the Finder. You’ll get the hang of it quickly.
Finder has the habit to drop some .DS_Store files here and there. Ignore them aggressively in .gitignore. At least disable them on netowrk shares:
# stop polluting network shares
defaults write com.apple.desktopservices DSDontWriteNetworkStores -bool true
# stop polluting USB disks
defaults write com.apple.desktopservices DSDontWriteUSBStores -bool true
Package management
I don’t like Homebrew (no offense, they’re doing great work. I just don’t like it). It saves the day once in a while but it’s really subpar compared to Linux package managers such as apt or pacman, with a number of shortcomings I personally find unacceptable.
So I use nixpkgs which is a bit scary at first blush but is in fact quite easy to set up and use (really, no harder than Homebrew). You’ll find an intro to that on this very blog.
There’s also good old MacPorts and pkgsrc which I heard good things about.
Docker, and Linux on macOS
I really don’t enjoy Docker for Mac: it’s a kitchensink, the new UI is a WebKit mess full of call-to-actions, and even docker images is for some reason slower than using a Linux VM in VMware Fusion. The latter really takes the crown in performance and stability.
So get Fusion, and get a VM.
I have a basic one at hand with Docker, X, and the absolute minimal essential things set up to have it behave nicely right away.
curl -o ~/Downloads/ArchVMware.tar.gz http://some.where.undisclosed/ArchVMware.tar.gz
echo '1bdb49b5f5076be882ed601244f525848ff9fca39b8cbd5d363f606ea78d65f8  ArchVMware.tar.gz' | shasum -c
tar -C ~/'Virtual Machines.localized' -xvzf ~/Downloads/ArchVMware.tar.gz
~/'Virtual Machines.localized' is created by Fusion.
Default auth is root / hunter2 (hehe), so I override that right away.
There’s a .xsession for root which is exec i3
As root:
user='<username>'
useradd -m "${user}"
passwd "${user}"
gpasswd -a "${user}" audio
gpasswd -a "${user}" video
gpasswd -a "${user}" docker
gpasswd -a "${user}" wheel
cp ~/.xsession /home/"${user}"/.xsession
chmod 700 /home/"${user}"/.xsession
chown "${user}":wheel /home/"${user}"/.xsession
And a quick ~/.xsession for the new user:
xrdb -merge ~/.Xresources
#export QT_AUTO_SCREEN_SCALE_FACTOR=1
export QT_AUTO_SCREEN_SCALE_FACTOR=0
export QT_SCALE_FACTOR=1
export QT_SCREEN_SCALE_FACTORS=2
export GDK_SCALE=2
export GDK_DPI_SCALE=0.5
picom --daemon --no-dock-shadow --no-dnd-shadow --shadow-radius=0 --shadow-opacity=0 --shadow-offset-x=0 --shadow-offset-y=0 --fade-in-step=0.028 --fade-out-step=0.028 --fade-delta=1 &
~/.fehbg &
dunst &
exec i3
To round up HiDPI, put that in .Xresources
Xft.dpi:        192
!Xft.dpi:        96
Xft.antialias:  true
Xft.rgba:       rgb
Xft.hinting:    true
Xft.hintstyle:  hintslight
Finally on the macOS side, one can do:
# on macOS
$ nix-env -iA docker
$ export DOCKER_HOST="ssh://${user}@172.16.159.5" # look up the VM IP
$ docker images
vmhgfs is set up and mounted at /mnt/vfhgfs. I add a symlink at /Users to /vmhgfs/Users, so docker run -v "${PWD}":/somewhere/in/container some:image just works, even from macOS.
For port forwarding to and from the VM, I suppose one could set up some ports in Fusion, but I just use:
ssh -N -L 127.0.0.1:8080:127.0.0.1:8080 172.16.159.5
Sometimes I get some short stalls once in a while with 3D accel (feels like some garbage collect). If you want to disable 3d acceleration, alacritty won’t work (it needs 3d accel) so switch terminal:
sudo pacman -S xterm
# vim ~/.xsession
export TERMINAL=xterm
And to make xterm palatable, add this to ~/.Xresources:
!---- xterm ----
xterm*geometry:           80x24
xterm*borderWidth:        0
!xterm*faceName:           terminus:bold:pixelsize=14
!xterm*faceName:           Menlo:pixelsize=14
xterm*faceName:           Menlo:pixelsize=24
!xterm*font:              -*-dina-medium-r-*-*-16-*-*-*-*-*-*-*
xterm*dynamicColors:      true
xterm*utf8:               2
xterm*eightBitInput:      true
xterm*saveLines:          10240
xterm*scrollKey:          true
xterm*scrollTtyOutput:    false
xterm*scrollBar:          false
!xterm*scrollBar*thickness: 1
xterm*rightScrollBar:     true
xterm*jumpScroll:         true
xterm*multiScroll:        true
xterm*toolBar:            false
xterm*termName:           xterm-256color
xterm*loginShell:         true
xterm*selectToClipboard:  true
xterm*VT100.Translations: #override \
      Shift Ctrl<Key>V: insert-selection(CLIPBOARD) \n\
      Shift Ctrl<Key>V: insert-selection(PRIMARY) \n\
! Zenburn
!xterm*scrollBar*background:  #3f3f3f
!xterm*scrollBar*foreground:  #dcdccc
xterm*background:  #3f3f3f
xterm*foreground:  #dcdccc
xterm*color0:      #1E2320
xterm*color1:      #705050
xterm*color2:      #60b48a
xterm*color3:      #dfaf8f
xterm*color4:      #506070
xterm*color5:      #dc8cc3
xterm*color6:      #8cd0d3
xterm*color7:      #dcdccc
xterm*color8:      #709080
xterm*color9:      #dca3a3
xterm*color10:     #c3bf9f
xterm*color11:     #f0dfaf
xterm*color12:     #94bff3
xterm*color13:     #ec93d3
xterm*color14:     #93e0e3
xterm*color15:     #ffffff
For the VM, I disable -all- keyboard shortcuts and mappings. This way entering fullscreen makes it as close to the real deal as possible. The only mandatory shortcut is pressing and releasing CMD+CTRL, which releases input capture from the VM.
Watch out for the default mouse shortcuts as well, especially if you want to use Option+Right Click in a window quadrant to quickly resize.
Wrap-up
This is only a basic guide, but dropping all the tips down at once would be a significant undertaking. There’s much more to discover, learn, tweak, and adjust to, but I hope this can already be helpful! Darwin can be a great platform if you keep your mind open. Maybe this could be material for a second part.